Completing Coaching Sessions
One-on-one coaching is an essential part of developing both managers and agents. It provides a structured space to review performance, reinforce desired behaviors, and build long-term growth.
Before creating coaching sessions, make sure you have already set up your coaching forms and added coaching steps. These define the structure and content of every coaching interaction.
- To learn how to create a coaching form, see Create and Edit Coaching Forms.
- To learn how to add and configure coaching steps, see Adding and Understanding Coaching Steps.
Once your forms are complete, you can begin creating coaching sessions to document conversations, record commitments, and track progress over time.
Begin Coaching Session
To begin a coaching session, you must first select the user you will be coaching and the coaching form you want to use.
There are four ways to start a new session and select both the user and form:
- Users – Start a session directly from the user list by selecting an individual agent.
- Teams – Begin a session from the team view to coach an agent within a specific team.
- Coaching Form – Start a session by choosing a specific coaching form first, then select the agent.
- Coaching Sessions – Start a session from the Coaching Sessions page, either by repeating a previous session using Coach Again or by creating a new one with + New Session.
Users
To start a coaching session from the Users menu, go to the Organization section and select Users. Locate the user you want to coach, then click the Action icon at the end of their row and select Coach.
A session setup window will appear with the selected user already pre-populated. From there, choose the coaching form you want to use for the session.
Teams
To start a coaching session from the Teams menu, go to the Organization section and select Teams. Locate the team you want to view, then click the Action icon at the end of the row and select View. This will display all users assigned to that team.
Find the agent you want to coach, click the Action icon at the end of their row, and select Coach. A session setup window will appear with the agent pre-populated. Choose the coaching form you want to use, just as you would when starting a session directly from the Users menu.
Coaching Forms
To start a session from a specific coaching form, go to the Coaching menu and select Forms. This will display all available coaching forms. Locate the form you want to use, then click the Action icon at the end of the row and select Coach.
A session setup window will appear with the selected coaching form already pre-populated. You will then be prompted to choose the agent for the session. A selection window will open where you can select only one agent to coach.
Coaching Sessions
The final two ways to start a coaching session are from the Coaching Sessions page.
- Coach Again
- Use this option to repeat a previous session with the same agent and coaching form. Go to the Coaching Sessions page, locate the completed session you want to repeat, click the Action icon at the end of the row, and select Coach Again. A new session will open with the same agent and form pre-populated, allowing you to continue coaching on related topics or follow up on prior commitments.
- + New Session
- You can also start a brand-new session directly from the Coaching Sessions page. Click the + New Session button to open a new session setup window. You will need to select both the agent and the coaching form you want to use before beginning the session.
Complete Coaching Session
Once a coaching session has started, you will complete it by filling out each step that was defined in the coaching form. Every field and question displayed in the session is based on the setup of that form.
- For Yes/No Questions, select either Yes or No.
- For Primary Coaching Topic, Secondary Coaching Topic, and Single Select, choose one item from the available levels.
- For Notes Entry, type your notes or observations.
- For Attachments, upload a single supporting document if needed.
- For Multi Select, choose one or more options from the dropdown list.
Keep in mind two important details:
- Any required question will have a red asterisk next to it. These must be completed before saving or submitting the session. All other fields are optional.
- If a question includes a Notes Section, you must enter a comment or note for that item before proceeding.
Three coaching steps need additional explanation: KPI, Commitment, and Follow Up Date. These are covered in the next section.
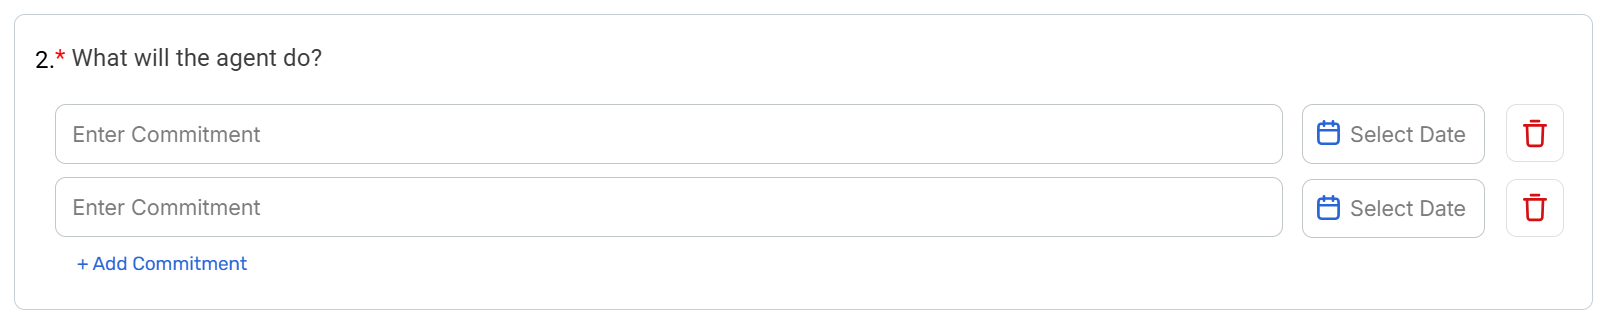
Commitment
The Commitment section records the specific actions or goals the agent agrees to complete by a certain date. Each coaching session includes one Commitment field where you can add multiple items.
Click Add Commitment to include additional commitments. At the end of each row, enter the due date for the agent to complete that commitment.
If you need to remove a commitment, click the Delete icon next to that item. However, there must always be at least one commitment in the session.
All commitments entered during the session will appear on the agent’s dashboard as reminders, helping them stay accountable for their agreed actions.
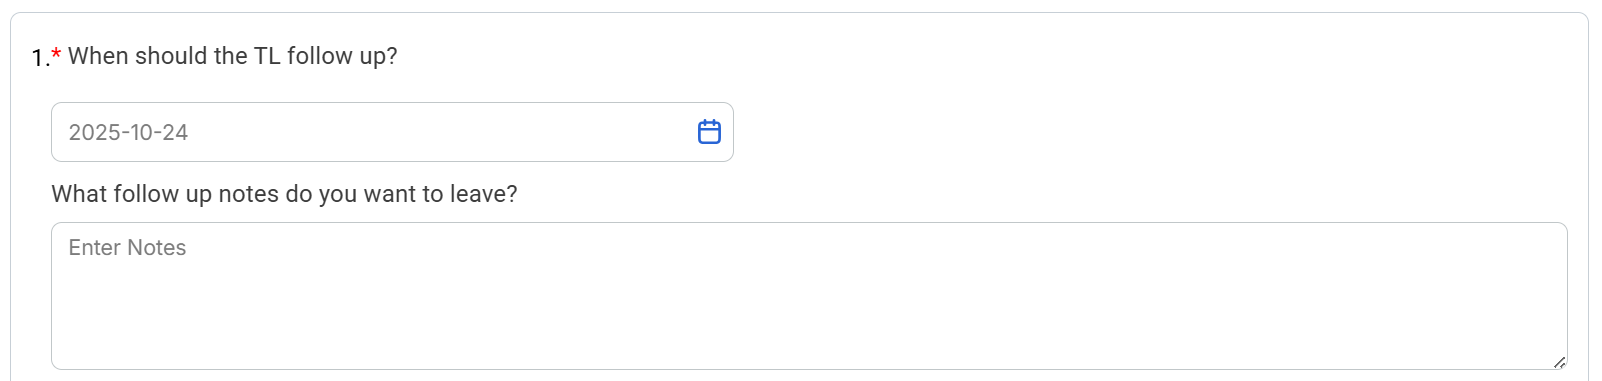
Follow Up
Just as agents have commitments to complete, the Follow Up Date step is designed for managers. It helps ensure accountability by setting a specific date for the manager to follow up on the agent’s progress.
In this section, the manager enters both the follow-up date and a brief description of what they will be following up on. The follow-up reminder will appear on the manager’s dashboard, prompting them to review the agent’s progress at the scheduled time.
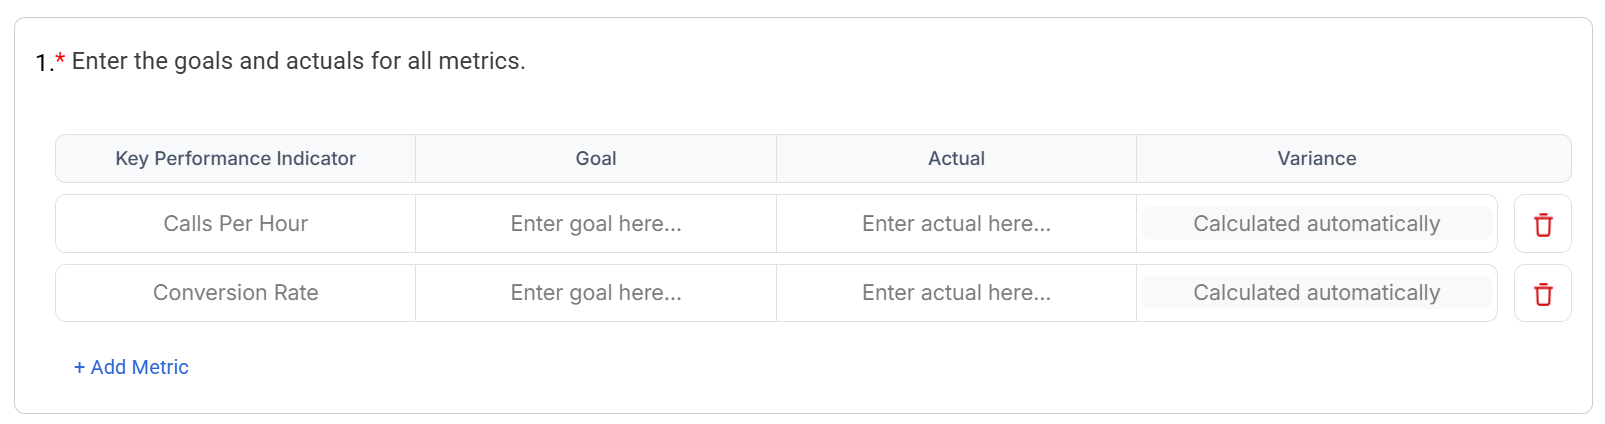
KPIs
The KPI section works the same way as Commitments in that you can add multiple entries, but at least one KPI is required.
Click + Add Metric to include another KPI, or click the Delete icon to remove one. For each KPI, enter the metric name, the goal, and the actual value. The variance will be automatically calculated based on those numbers.
Only numeric values can be entered for goals and actuals.
Save and Coached
After you have filled out the coaching form and completed all parts of the session, click the Save & Coached button. A confirmation window will appear to ensure you want to finalize the session.
Once a coaching session is completed, it cannot be changed. If email notifications are enabled, the agent will receive an email letting them know the session is available to view in their portal.
If you are not finished and want to continue later, click Save Only instead. This will save all progress up to that point, but the session will not be marked as complete until you click Save & Coached.

Note:
At the top of each coaching session, you will see tabs displaying the five most recent sessions completed with the same coaching form. You can switch between these tabs to review past sessions, then return to the Current tab to continue working on the active session.
If you click Auto Fill, the current session will automatically populate with the most recent session’s information. You can still make edits after auto-filling. To clear the prefilled data and return to a blank session, click Auto Fill again.
Coaching sessions bring your coaching forms to life, turning structure into meaningful one-on-one conversations that drive accountability and growth. By recording commitments, setting follow-up dates, and tracking KPIs, both managers and agents stay aligned on progress and development goals.
Once a coaching session is completed, it becomes part of each agent’s learning history, allowing you to review progress over time and strengthen future sessions.